Hello JNI (6), Android 버전
From Evernote: |
Hello JNI, Android 버전 |
Hello JNI의 안드로이드 버전이다. 액티비티의 onCreate() 메서드에서 네이티브 라이브러리로 문자열을 전달할 것이고, 네이티브 라이브러리에서는 전달받은 문자열을 적당히 처리한 후 다시 자바 쪽으로 돌려줄 것이다. 액티비티는 돌려받은 문자열을 텍스트뷰에 출력한다.
NDK를 추가로 설정하는 외에 다른 설정은 이전의 글들을 참고하기 바란다.
NDK를 다운로드 받은 후 적당한 곳에 압축을 풀어 놓는다.
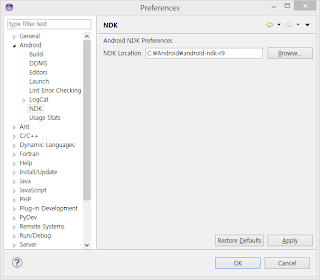
이클립스의 워크스페이스 설정 창에서 NDK의 경로를 지정해둔다.
안드로이드 프로젝트를 생성하고, 네이티브 메서드를 추가하고, onCreate() 메서드에서는 네이티브 함수로부터 돌려받은 문자열을 텍스트뷰에 출력하도록 작성하였다.
package kr.pe.elex.example.jni;
import android.app.Activity;
import android.os.Bundle;
import android.widget.TextView;
public class MainActivity extends Activity {
static {
System. loadLibrary("hellojni");
}
private native String jni(String str);
@Override
protected void onCreate(Bundle savedInstanceState) {
super.onCreate(savedInstanceState);
setContentView(R.layout. activity_main);
TextView textview = (TextView) findViewById(R.id. textview);
textview.setText(jni( "Hello Android"));
}
}
#. 실제로 생성될 라이브러리 파일의 이름은 아래에서 보여지는 것과 마찬가지로 libhellojni.so 이지만, 스태틱 블럭에서 라이브러리를 불러올 때에는 앞에 lib를 붙이지 않는다. 즉, "libhellojni"가 아니라 그냥 "hellojni"이다.
패키지 익스플로러에서 프로젝트의 최상위 폴더를 오른쪽 클릭하면 컨텍스트 메뉴가 나오는데 Android Tools > Add Native Support...를 선택한다. 아래와 같은 창에서 라이브러리 파일의 이름을 지정해준다.
Finish를 클릭하면 C/C++ 퍼스펙티브로 전환되고, jni 폴더 및 .cpp, Android.mk 파일등이 생성된다.
#. 기본적으로 C++ 파일이 만들어진다. C 프로젝트로 만들도록 기본 설정을 바꾸는 방법은 없나? 모르겠다. 임의로, C 소스 파일을 추가해봤는데 CDT의 Indexer가 말을 듣질 않는다. (즉, 자동완성 등을 사용할 수가 없다.)
여러가지 설정을 건드려서 가능하긴 한 것 같은데 ... 너무 복잡하다. 이에 대해 궁금하면 이 글(http://android-code-zen.blogspot.kr/2013/05/hello-world-android-ndk-eclipse.html)을 참고하기 바란다.
javah 툴을 사용해서 헤더 파일을 추출할 때에는 옵션이 조금 추가된다. 아래 그림과 같이 -classpath 옵션을 추가해줘야 한다. (세미콜론(;)을 잊지 말 것!)
명령 프롬프트에서는
java.h -classpath <sdk경로>android.jar; <자바클래스>
이제 네이티브 코드를 작성할 차례다.
#include <cstring>
#include "kr_pe_elex_example_jni_MainActivity.h"
JNIEXPORT jstring JNICALL Java_kr_pe_elex_example_jni_MainActivity_jni
(JNIEnv *env, jobject obj, jstring str){
const char* s1 = env->GetStringUTFChars(str, NULL);
const char* s2 = " from Jni!";
int size = env->GetStringUTFLength(str) + strlen(s2) - 1;
char newStr[size];
strcpy(newStr, s1);
strcat(newStr, s2);
env->ReleaseStringUTFChars(str, s1);
return env->NewStringUTF(newStr);
}
#. 윈도우즈 환경이 아니므로 함수명 앞에 밑줄문자(_)를 추가해 줄 필요가 없다.
#. GetStringUTFLength(str) 대신에 strlen(s1)이라고 해도 마찬가지지만, 그냥 한 번 JNI 메서드로 써봤다.
#. 전달 받은 문자열에 다른 문자열을 추가하고 되돌려준다.
#. 이전 글 [Hello JNI, C++ 버전]과 같은 동작을 하지만, 이번에는 C의 함수들을 사용해 봤다.
<프로젝트 파일>
http://www.elex.pe.kr/attachment/cfile21.uf@2514334F523204F807C853.7z
그리고, 보너스~
안드로이드 네이티브 라이브러리를 디버깅하는 방법
http://tools.android.com/recent/usingthendkplugin
1. Update your build config to include "NDK_DEBUG = 1".
1. Update your build config to include "NDK_DEBUG = 1".
2. Set a breakpoint in your C code.
3. Right click on your project, select Debug As -> Android Native Application
Note: There is a delay of a few seconds between when the activity is launched and when native debugging starts. If your code is already executed by that point, then you won't see the breakpoint being hit. So either put a breakpoint in code that is called repetitively, or make sure that you call JNI code after you see that ndk-gdb has connected.


댓글
댓글 쓰기